|
| Dia. 2 |
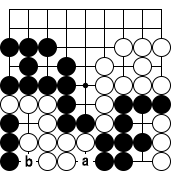
Symmetry also means that either black can capture the white group or else neither player can make any move, in which case they are locked up in this position, meaning it is basically a mutual life, ie. seki situation.
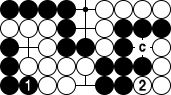
Dia. 2: If black were to play, he would have only two rational
choices, a and b.
 |
| Dia. 3 |
 |
| Dia. 4 |
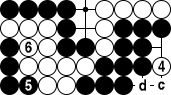
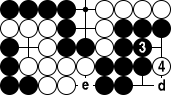
Dia. 4: After white 4 it wouldn't help black to play at c
because white would simply capture at d putting black in
atari, and since black doesn't have any ko-threats white would capture
the black stones in the next move. Thus black could only try to do
something with 5, but that doesn't help either, as seen in Dia. 5.
 |
| Dia. 5 |
 |
| Dia. 6 |
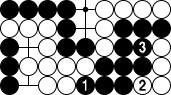
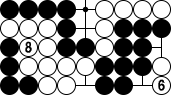
Dia. 6: White's best and only answer is to mirror black's move. Any other move would cause white to lose the semeai (you can check all the other possible white's answers if you like).
The situation is now basically the same as at the beginning: Either black (who has sente) can now capture white's stones or neither player can and thus this is still a seki. Filling the common liberty would be auto-atari and thus naturally out of question, so the only possible black continuation would be to capture at c.
Curiously, if black plays at c, he will lose the semeai.
 |
| Dia. 7 |
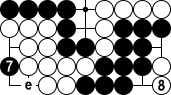
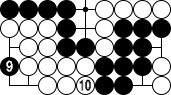
If black plays at e the result will be basically the same
as in the diagrams 4 and 5, thus black loses the semeai. Passing makes
the loss even more clear because white can simply play at d and
easily win the semeai. In fact, white doesn't need to play anything because
black is already dead and can't do anything about it.
 |
| Dia. 8 |
 |
| Dia. 9 |
 |
| Dia. 10 |
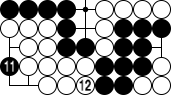 |
| Dia. 11 |
Dia. 11: After white 12 the situation
is similar to Dia. 9, but white is now two steps ahead in the semeai
and thus it's even more clear that he will win it.
Neither player can try to capture the opponent's group because trying it will only cause oneself to lose the semeai. Thus this is a seki situation and all the stones are alive in most rulesets.
How about Japanese rules? Curiously enough, this should be a seki even there, at least if we are using the 1989 ruleset. This ruleset does not specify the bent-four in the corner being dead as previous rulesets did. This ruleset simply specifies that at confirmation stage the only valid ko threat is passing. However, as we saw in the above diagrams there was no ko fight in any variation where the fact that the opponent can't make a ko threat could be used (because the opponent couldn't make a ko threat during the game either).
Thus this is an example of bent-four in the corner not being dead even under Japanese rules. Hence the name of the page.
An interesting question is, however, what would be the status when using
a Japanese ruleset previous to 1989. If one group would be declared dead,
then the other would be alive, but since the other group is also a bent-four
in the corner, it should be dead as well, not alive. The set for controversy
would be ready.
© Copyright 2004 Juha Nieminen
![]()