IMPORTANT NOTE: These instruction apply only to POV-Ray 3.1. They do not apply to POV-Ray 3.5 nor any newer version, as radiosity has changed quite a lot since 3.1.
I'm not a POV-Ray radiosity expert, so don't consider this a complete tutorial about radiosity. This text only contains some things about my experiences about the radiosity of POV-Ray. Since it seems to be a non-trivial task to get the right settings for a specific scene, this may help a little.
Here are some rules I have discovered about radiosity in POV-Ray:
The settings into the radiosity-block in global_settings are not the only things that affect radiosity calculations. The ambient light plays a very important role in radiosity.
It seems to be a very common mistake to think that the ambient setting in the global_settings block is a substitute of the radiosity and that when you use radiosity, you should set the ambient to 0. I understand this because I thought this too when I first used radiosity.
Actually the ambient level of the objects is essential for the radiosity calculations. If you set the ambient of an object (or the whole scene in the global_settings block) to 0, this means that object will not illuminate its surroundings (ie. it will not reflect light). If you set it to 0, you are actually telling to povray "this object doesn't emit ambient light" which is the same as "don't calculate radiosity for this object". Radiosity is in fact just a more advanced way to calculate the ambient light.
Ambient light is in fact so essential, that I set it to 4 times as bright as usual for these scenes, ie:
global_settings { ambient_light 4 }
Note that this will make the objects much brighter than usual. Objects will actually glow light. This means that they will emit light to their surroundings even if there are no light sources in the scene. I used this trick to enhance the radiosity. It may be too bright for some scenes so you'll have to experiment with proper values.
This can be used to make "fake" light sources, ie. objects that emit light. If you
set the ambient level of an object to 1 (or more), it will be very bright and it will
emit light to its surroundings. This can be used to make true area lights (as opposed
to the fake area lights of POV-Ray).
I didn't use this technique in these scenes but used an area light source mainly
because the bright object has to be very big to really affect the scene. You can see
this effect in the 3rd test image (it would have worked if I had set the ambient light
of the circular object much brighter instead of illuminating it with a spotlight).
Using light sources has the advantage that you get good shadows and highlights without
having to set extreme radiosity values.
Note that if you have ambient_light set to 4 in global_settings, to set the ambient of an object to 1, you actually have to give it the value 0.25 (because they are multiplied together). I used this light source in the first two scenes:
#declare Light=

  union

  { box { <-1,-.2,-1><1,.2,1> no_shadow pigment { rgb 1 } finish { ambient .25 } }

    light_source

    { 0, 1 area_light x*2,z*2,10,10 adaptive 0

    }

  }
You should always confine your radiosity scene inside a closed room. Radiosity usually doesn't work very well in outdoors scenes. I once tried the same settings as in these scenes with an outdoors scene, and the image was really awful. It looked like an extremely overexposed photograph. If you ever need radiosity for an outdoors scene, you should try with a lot less bright settings.
For some (perhaps technical) reason, the size of the room is important. I really don't know why, but this seems to be the way it works.
Tip: Don't use a room much bigger than about 20 POV-Ray units. The room I used in
these scenes is a box of size <-11,-8,-18>,<11,8,11>.
I have tried with very big rooms and it seems impossible to find the right radiosity
settings. You always get blotchiness or graininess and annoying dark spots in the
corners. I have not tried with very small rooms.
So here we have the base scene for the first image:
global_settings

{ ambient_light 4

}


camera { location -z*17 look_at 0 }


// Room

difference

{ box { <-12,-9,-19><12,9,12> }

  box { <-11,-8,-18><11,8,11> }

  pigment { rgb <1,1,.8> }

}

box

{ <-11,-8,-18><-10.99,8,11>

  pigment { rgb <1,.5,0> }

}

box

{ <11,-8,-18><10.99,8,11>

  pigment { rgb <0,.5,1> }

}


#declare Light=

  union

  { box { <-1,-.2,-1><1,.2,1> no_shadow pigment { rgb 1 } finish { ambient .25 } }

    light_source

    { 0, 1 area_light x*2,z*2,10,10 adaptive 0

    }

  }


object { Light rotate z*-45 translate <10,7,8> }


union

{ box { <-.4,-8,-4><.4,-1,4> }

  box { <-.4,-1,-4><-6,-1.5,4> }

  pigment { rgb <1,.8,.4> }

  translate x*3+z*4

}

box { <-3,-8,0><3,-.5,-1> pigment { rgb <1,.7,.7> } rotate y*-45 translate <-9.5,0,9.5> }


#declare Jar=

  sor

  { 8

    <0,0><2,0><2.1,.4><2,.8><2.5,5>

    <1.5,7><2,8><2.1,8>

    sturm

    pigment { rgb 1 } finish { specular .2 }

    scale .5

  }


object { Jar translate -y+z*4 }


#declare Jar2=

  sor

  { 9

    <0,0><1,0><2.5,1.2><3,3><2.5,4.5>

    <1,7><1,8><1.5,8.5><2,8.5>

    sturm

    pigment { rgb <1,.5,.2> } finish { specular .2 }

    scale .5

  }


object { Jar2 translate <0,-8,4> }
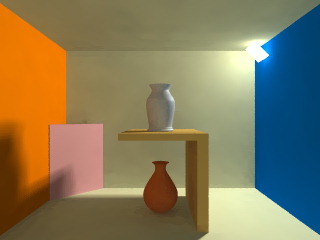
We have now set our base scene ready for the radiosity. Actually the default values
may work pretty fine. If you render the scene as is with radiosity turned on, you
get a quite acceptable radiosity image. Rendered it looks like this:

We see that the actual radiosity settings are not so important as you could have thought. Just with proper ambient light settings and a room of a proper size we get quite acceptable radiosity with the default settings and pretty fast.
Of course this is not enough. There's blotchiness in the image and the shading of the objects could be better. Let's examine some of the radiosity settings:
There are four main settings which affect essentially the radiosity quality:
Now that we have the main settings, let's try them. We add this to global_settings:
  radiosity

  { count 500

    distance_maximum 1

    error_bound .2

    minimum_reuse .001

  }
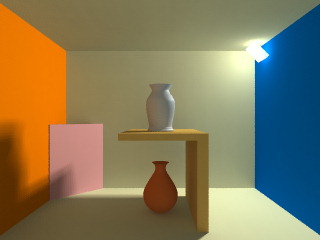
And when we render we see that the image looks much better:
The other settings are just for fine-tuning the radiosity and they don't have so
drastical consecuences. Adjusting them you get slightly better radiosity, though.
Specially the recursion limit may affect the quality of the radiosity
(as you can see in the test images). See the documentation for more help about them.
I used these settings for the test images:
  radiosity

  { brightness 8

    count 500

    distance_maximum 1

    error_bound .2

    gray_threshold .1

    low_error_factor .5

    minimum_reuse .001

    nearest_count 6

    recursion_limit 2

  }