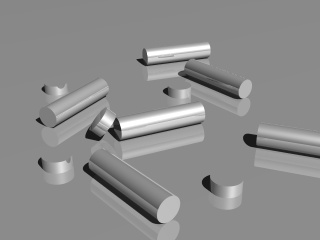
I have developed during the years certain simple little tricks which
I often use to enhance the visual quality of simple images like the one
on the right when rendering with POV-Ray. While these tricks are in no
way innovative or revolutionary, knowing them is a good way to enhance
your images.
In the image on the right there's simply a plane as a floor and some
simple objects. Its source code can be viewed here.
The objective of this little tutorial is to greatly enhance the visual
quality of this simple scene without changing the shape of these objects
nor adding any new objects, just using the ones that are there already.
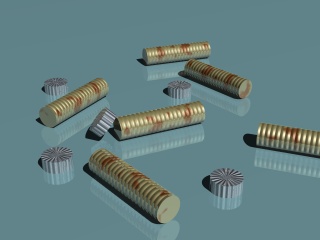
Tip 1: Textures
Perhaps the most important part of any scene is the texturing of the
objects. You can have the most complex and carefully designed objects in
your scenes, but if their textures look bad, the entire image will look bad.
On the other hand, carefully created textures can make even the simplest
objects look considerably better.
Here are some tips for the texturing:
Unless your object is a polished smooth object, always try to develop
an interesting normal definition for it. Normal perturbation,
when used right, greatly enhances the looks of the object because it
introduces fine details to it.
If you use normal perturbation, seriously consider developing a good
slope_map for it. Slope maps can be used to greatly enhance
the quality of normal perturbation.
Always use a finish block, even with very matte textures.
Objects without a finish tend to look very dull and boring. Finish
elements can make dull surfaces look vivid and lively.
The image on the right demonstrates the last point in the above list. Just
by adding a simple finish (specular highlights, reflection) to the objects
makes them already look a lot better than the original.
In the image on the left a pigment and normal block has been added to the
objects. Neither of them is very complicated, but even simple ones like
these add a lot to the image.
As seen in the image, it's not always necessary to add new geometry to
the objects in order to add details to them. Sometimes just using a clever
normal block can make the objects look more complex than they really are.
Even though the objects seem to have ridges, they still are just simple
cylinders, as in the original images above.
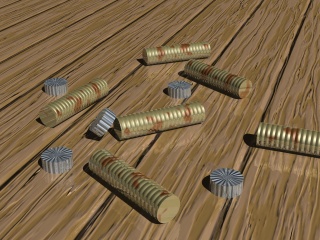
In the previous example a flat-colored floor was used. Another
alternative is to create an elaborated texture for the floor, as in
the image on the right. Which one is more suited for the image in
question depends. A rich floor texture like this one adds a lot of
detail to the image, visual noise so to speak, and this slightly robs
attention from the objects themselves. A flat-colored floor enhances
the objects. In the end, which one is better depends on the author's
artistical eye.
Notice how the floor now seems to be composed of wooden planks, even
though it's still just a plane and nothing more. Another cool trick that
can be achieved with normal perturbation.
The scene with the enhanced floor can be seen here.
Tip 2: Enhancing the lighting
There's a very simple but great trick to considerably enhance the lighting
of a simple scene like this one: Put the light source close to the scene
and make it a fading light. Always use fade power 2 for this. The impacting
effect of this simple trick can be seen in the image on the right.
The idea is simple, but the results are surprisingly effective. Just
the location of the light source makes the scale of the scene change in
appearance.
And of course the second great trick and mandatory enhancement for such
a closeup light source is to make it an area light, as seen in the image
on the right. Just the change in the shadows makes the light source feel
to have a volume, it makes it more tangible.
The scene with the enhanced lighting can be seen
here.
Tip 3: Try several light sources
One thing to try is to use multiple light sources. These should usually
be colored differently from the main light, and perhaps be slightly
dimmer. They should also usually be quite close to the scene and fading
area lights.
One cool effect can be achieved by putting one of the light
sources as a backlight so that it causes a strong specular highlight
on the floor. The finish of the floor should be fine-tuned to enhance
this highlight.
Using several light sources also kind of replaces the need to use
radiosity to enhance the scene. Radiosity is quite hard to get looking
right, and usually needs additional scenery around in order to have any
significant effect. Using multiple light sources instead is often a good
alternative.
The scene with two more light sources can be seen
here.
Tip 4: Focal blur
Focal blur makes the scene look like it has been photographed with a
macro lens, which is often a rather cool effect which enhances realism.
In this kind of image it makes the scene look small-scale, photographed
from close distance.
 I have developed during the years certain simple little tricks which
I often use to enhance the visual quality of simple images like the one
on the right when rendering with POV-Ray. While these tricks are in no
way innovative or revolutionary, knowing them is a good way to enhance
your images.
I have developed during the years certain simple little tricks which
I often use to enhance the visual quality of simple images like the one
on the right when rendering with POV-Ray. While these tricks are in no
way innovative or revolutionary, knowing them is a good way to enhance
your images.
 In the image on the left a pigment and normal block has been added to the
objects. Neither of them is very complicated, but even simple ones like
these add a lot to the image.
In the image on the left a pigment and normal block has been added to the
objects. Neither of them is very complicated, but even simple ones like
these add a lot to the image.
 In the previous example a flat-colored floor was used. Another
alternative is to create an elaborated texture for the floor, as in
the image on the right. Which one is more suited for the image in
question depends. A rich floor texture like this one adds a lot of
detail to the image, visual noise so to speak, and this slightly robs
attention from the objects themselves. A flat-colored floor enhances
the objects. In the end, which one is better depends on the author's
artistical eye.
In the previous example a flat-colored floor was used. Another
alternative is to create an elaborated texture for the floor, as in
the image on the right. Which one is more suited for the image in
question depends. A rich floor texture like this one adds a lot of
detail to the image, visual noise so to speak, and this slightly robs
attention from the objects themselves. A flat-colored floor enhances
the objects. In the end, which one is better depends on the author's
artistical eye.
 There's a very simple but great trick to considerably enhance the lighting
of a simple scene like this one: Put the light source close to the scene
and make it a fading light. Always use fade power 2 for this. The impacting
effect of this simple trick can be seen in the image on the right.
There's a very simple but great trick to considerably enhance the lighting
of a simple scene like this one: Put the light source close to the scene
and make it a fading light. Always use fade power 2 for this. The impacting
effect of this simple trick can be seen in the image on the right.
 And of course the second great trick and mandatory enhancement for such
a closeup light source is to make it an area light, as seen in the image
on the right. Just the change in the shadows makes the light source feel
to have a volume, it makes it more tangible.
And of course the second great trick and mandatory enhancement for such
a closeup light source is to make it an area light, as seen in the image
on the right. Just the change in the shadows makes the light source feel
to have a volume, it makes it more tangible.
 One thing to try is to use multiple light sources. These should usually
be colored differently from the main light, and perhaps be slightly
dimmer. They should also usually be quite close to the scene and fading
area lights.
One thing to try is to use multiple light sources. These should usually
be colored differently from the main light, and perhaps be slightly
dimmer. They should also usually be quite close to the scene and fading
area lights.
 Focal blur makes the scene look like it has been photographed with a
macro lens, which is often a rather cool effect which enhances realism.
In this kind of image it makes the scene look small-scale, photographed
from close distance.
Focal blur makes the scene look like it has been photographed with a
macro lens, which is often a rather cool effect which enhances realism.
In this kind of image it makes the scene look small-scale, photographed
from close distance.
